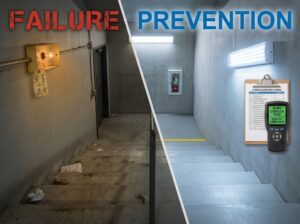
In every renovation project, sparks fly—literally and figuratively. Scorching heat from hot-work processes, solvents and paints with volatile vapors, electrical work, and cluttered work zones all compound the risk of a fire on the job site. The result can be more than costly delays; a preventable fire can threaten lives, interrupt critical work, and trigger insurance and regulatory consequences. If you’re managing a renovation—whether a commercial retrofit, a multi-unit residential remodel, or a home improvement project—the question isn’t whether a fire can happen, but whether you’ve built a robust, compliant fire safety plan around extinguishers and other protective measures.
This article provides a practical, industry-grounded guide to fire safety during renovation, focusing on construction fire extinguisher requirements, placement, maintenance, and best practices you can implement immediately. We’ll cover regulatory expectations from OSHA and NFPA, translate them into actionable steps for site managers, contractors, and homeowners, and close with how 48Fire Protection can support your project with tailored services.
—
Why renovations are uniquely risky for fire safety
Renovation sites are dynamic. Existing structures often become temporary, improvised workplaces full of potential ignition sources and piled combustibles. Consider the following realities common on renovation sites:
- Hot work (welding, grinding, torch-cutting) introduces ignition sources in spaces with limited ventilation and cluttered materials.
- New or dormant electrical systems may be energized or partially energized, with wiring that is exposed or damaged.
- Flammable liquids (solvents, paints, adhesives) and combustible dust from finishes can accumulate in corners and voids.
- Temporary power, generators, and extension cords create both electrical and trip hazards, increasing the risk of accidental contact with hot surfaces or sparks.
- Temporary storage areas for materials, tools, and waste can become fire fuel if not effectively segregated and kept clean.
If not properly controlled, these conditions can transform a routine remodel into a scene where a small flame grows quickly. The consequences range from smoke damage and structural compromise to life-safety incidents for workers and occupants.
Key takeaway: Fire safety during renovation isn’t a luxury; it’s a central project deliverable. Fire protection must be planned, resourced, and integrated into daily workflows, not tacked on as an afterthought.
—
Regulatory foundation: what the standards require
To make sense of “what you must do,” it helps to anchor expectations in the primary standards that govern construction fire protection and portable extinguishers. The ecosystem is a mix of regulatory requirements (OSHA) and consensus standards (NFPA). Three pillars guide most renovation sites:
- OSHA’s construction fire protection requirements (including extinguisher coverage and placement)
- NFPA standards for temporary protection and portable extinguishers
- Site-specific interpretation and application, often via OSHA’s eTools and NFPA guidance
OSHA: 1926.150 Fire protection (Construction)
OSHA’s construction fire protection standard is the backbone for on-site fire protection programs. It includes provisions for:
- A fire protection program on construction sites
- The placement and adequacy of portable extinguishers
- Ratings appropriate for the risks on site
The standard explicitly emphasizes that extinguishers must be provided and maintained in accessible locations, with the intent that workers can quickly reach one if a fire starts. The standard language is designed to ensure that even during a busy renovation, there is a practical, reliable means to control incipient fires before they become life-threatening incidents.
Practical implications you’ll see in the field include the requirement that extinguishers are available with sufficient rating and that the travel distance to the nearest extinguisher is not excessive. In the context of renovation sites, this typically translates to coverage calculated by floor area and the kind of hazards present.
- For many projects, the rule of thumb is a fire extinguisher rated not less than 2A for every 3,000 square feet of work area, with travel distances kept within a defined maximum (see the placement guidance below). These numbers are intended to create a practical density of extinguishers to respond quickly to a fire at its earliest stage.
- These requirements are especially important on busy renovation sites where materials are constantly moved, ignition sources are present, and access routes can be temporarily obstructed.
For reference, see OSHA’s official resource: [OSHA 1926.150 — Fire protection].
OSHA eTool: Evacuation Plans and Procedures — Portable Fire Extinguishers: Placement
OSHA’s eTools summarize NFPA 10 guidance on extinguisher placement for renovation sites, providing clear expectations for positioning and access:
- One 2-A extinguisher per 3,000 square feet (2-A rating is commonly used for ordinary-combustible hazards on many construction sites)
- Maximum travel distance to an extinguisher of 75 feet for Class A hazards
- Mounting height recommendations of 3.5 to 5 feet above the floor to ensure easy reach for workers of varying heights
- Emphasis on easy accessibility, visibility, and unobstructed access
These guidelines underline the practical aspect: extinguishers must be reachable within minutes, not hours, and positioned so a worker can grab one without negotiating clutter or dangerous conditions. The OSHA eTool link for extinguisher placement is here: [OSHA eTools — Portable Extinguishers: Placement].
NFPA 241-2022: Standard for Safeguarding Construction, Alteration, and Demolition Operations
NFPA 241 is the primary consensus standard addressing fire protection during construction activity, including renovation, alteration, and demolition. It lays out:
- Requirements for a comprehensive fire safety program tailored to construction and renovation activities
- Temporary protection measures (e.g., fire watch, active suppression equipment, and designated hot work zones)
- Procedures to minimize ignition sources, manage hot work, control flammable liquids, and coordinate with local fire authorities
The 2022 edition provides an up-to-date framework for safeguarding construction and renovation operations, aligning fire protection with evolving site practices and materials. You can review the standard here: [NFPA 241-2022].
Putting it together: practical interpretation for renovation teams
- Coverage density: Plan extinguisher placement around a 2-A rating per 3,000 sq ft rule, but underpin this with site-specific hazard analysis. For projects with significant Class A hazards (wood, paper, textiles) and more aggressive activities, you may need more extinguishers and/or higher ratings.
- Quick reach: Aim for 75–100 ft maximum travel distance depending on hazard class and local interpretations. The 75 ft target is particularly important for Class A hazards, while larger spaces may justify the 100 ft standard in certain regulatory interpretations.
- Organized, documented program: NFPA 241’s emphasis on a documented fire safety program means your plan should include hazard assessment, extinguisher placement maps, hot work controls, housekeeping measures, and a schedule for inspection and maintenance.
- Training and drills: The regulatory framework emphasizes training workers to recognize fire hazards and know how to respond with extinguishers and evacuation plans.
Citations and further reading:
- OSHA 1926.150 — Fire protection: [OSHA 1926.150]
- OSHA eTool: Portable Extinguishers — Placement: [OSHA eTools]]
- NFPA 241-2022: [NFPA 241-2022]
- NFPA 10 (Standard for Portable Fire Extinguishers): [NFPA 10]
—
Fire extinguisher basics you need on every renovation site
Before we dive into the how-to, here’s a quick primer on extinguisher types and ratings you’ll encounter in renovation settings.
- Class A extinguishers: Intended for ordinary combustibles like wood, paper, fabrics, and some plastics. Common rating: 1A–10A
- Class B extinguishers: Designed for flammable liquids such as solvents, paints, fuels. Typical sizes: 5B, 10B, 20B
- Class C extinguishers: For electrical fires (non-conductive in use after disconnection). Often packaged in combination with Class A or B (e.g., ABC or BC types)
- ABC extinguishers: Multipurpose extinguishers suitable for most renovations involving mixed hazards (wood, solvents, energized equipment)
- Water, foam, CO2: Depending on hazards, some sites may use specific types (e.g., water-based extinguishers for large surface-area Class A hazards, CO2 for occupied areas with sensitive electrical equipment). For renovations with volatile solvents or sensitive electronics, consult your fire protection pro for selectivity.
A practical takeaway: For most renovation crews, ABC dry chemical extinguishers cover a broad spectrum of hazards encountered on site, combined with targeted A or B extinguishers in higher-risk zones.
Table: Typical extinguisher types by hazard class on renovation sites
| Hazard class on site | Typical extinguisher type | Common rating examples | Placement notes |
|---|---|---|---|
| Ordinary combustibles (wood, paper, cardboard) | 2A or ABC | 2A–10A, often 2A | Near workstations, exits, and areas with paper/wood materials |
| Flammable liquids (solvents, paints, finishes) | BC, ABC (with B-rated component) | 5B–20B | In solvent storage areas, near painting stations, and solvent mixing zones |
| Electrical fires | Class C or ABC | 5C–20C or equivalent | Adjacent to electrical panels, wiring zones (non-energized or with safety protocols) |
| Mixed hazards (typical renovation) | ABC | 2A/10B/BC or 5A/20B/BC | Widespread, with higher concentration near hot work zones |
| Occupied spaces or sensitive equipment | CO2 or clean-agent equivalents (as appropriate) | 2–5 lb CO2 in limited occupancy areas (as dictated) | Consider in server rooms, telecom suites, and control rooms per risk assessment |
Pro tip: The exact mix of extinguishers depends on site-specific hazards, occupancy, and local fire department expectations. A site assessment by a qualified fire protection contractor can tailor the mix to your project.
Bold point: A well-planned extinguisher layout reduces response time, increases safety, and helps you maintain project momentum by preventing small fires from escalating.
—
A practical guide to extinguisher placement during renovations
Placement matters as much as the number of extinguishers. The goal is to ensure that any worker can reach a suitable extinguisher quickly, without squeezing through equipment, and without obstacles that would slow a response.
Key placement principles:
- Access: Extinguishers must be readily accessible, not concealed behind doors, stacked under shelves, or blocked by temporary structures.
- Visibility and labeling: Use clear signage and contrasting colors; ensure extinguishers are mounted in visible zones.
- Mounting height: Mount extinguishers at a height that is reachable for the typical worker, usually 3.5 to 5 feet above the floor.
- Environmental protection: Avoid placing extinguishers in damp, dusty, or corrosive environments unless they are designed for such conditions; protect from impact where possible.
- Maintenance and inspection: Regular checks are essential, with a documented inspection schedule.
The practical result is a map of extinguisher locations drawn onto site plans and updated as the project progresses.
Sample placement guidance (renovation context):
- Place one extinguisher every 3,000 square feet (2-A rating) and near high-traffic corridors, exits, and primary egress routes.
- In workshop or fabrication zones with hot work or solvent use, increase density to ensure shorter travel distances and add extinguishers specifically designed for Class B hazards.
- In areas with electrical work, consider extinguishers rated for electrical fires and ensure accessibility near electrical panels and wiring routes.
For additional details on placement, see OSHA’s portable extinguisher guidance: [OSHA eTools — Portable Extinguishers: Placement].
—
Implementation roadmap: from plan to practice
Below is a practical, field-friendly implementation guide you can apply to most renovation projects. It uses a Problem → Solution → Implementation framework to keep you focused on actionable steps.
Step 1: Conduct a hazard assessment (Problem → Solution)
- Problem: Your site has varying hazards across different phases (demo, rough-in, finish). A one-size-fits-all extinguisher strategy is inadequate.
- Solution: Perform a zone-based hazard assessment. Identify rooms or zones with the highest fire risk (e.g., solvent storage, hot work zones, electrical work areas).
- Implementation:
- Create a zone map labeling high-risk areas (hot work zones, solvent storage, electrical rooms, mechanical rooms).
- Document the hazard class per zone (A, B, or C) and assign extinguisher types and quantities per zone.
- Establish explicit travel-distance targets (75–100 ft depending on hazard) for each zone.
Step 2: Select and quantity extinguishers (Problem → Solution)
- Problem: Inadequate or inappropriate extinguisher types lead to ineffective responses.
- Solution: Choose a mix of extinguishers that target the hazards on site, with a clear allocation per zone.
- Implementation:
- For most renovations, stock a core supply of ABC extinguishers (2A/10B) for general use.
- Add additional Class B extinguishers (e.g., 20B) in solvent stores, paint shops, and chemical mixing zones.
- Include a few CO2 or clean agent extinguishers for areas with sensitive equipment or where occupant safety is a priority.
- Maintain a minimum of 1 extinguisher per 3,000 sq ft, with shorter travel distances near high-risk zones.
Step 3: Map placement and install (Problem → Solution)
- Problem: Extinguishers are placed inconsistently or in hard-to-reach locations.
- Solution: Create an extinguisher placement plan and annotate the site plan.
- Implementation:
- Develop a site-level extinguisher map showing each extinguisher’s location, rating, and zone.
- Ensure extinguishers are mounted at 3.5–5 ft, clearly labeled, and not blocked by scaffolding or equipment.
- Install signage indicating extinguisher locations (and perhaps a quick reference placard for Class A vs. Class B hazards near the zone).
Step 4: Training and procedures (Problem → Solution)
- Problem: Workers aren’t confident using extinguishers or unaware of evacuation routes.
- Solution: Implement a short, practical training program and clear procedures.
- Implementation:
- Conduct a 1-hour refresher on PASS technique (Pull, Aim, Squeeze, Sweep) and when to use different extinguisher types.
- Include a quick walkthrough of the site’s extinguisher map and hot-work permit procedures.
- Train someone as a “fire safety champion” on each shift to oversee compliance.
- Implement a simple hot-work permit system with mandatory extinguisher checks before work begins.
Step 5: Inspection and maintenance (Problem → Solution)
- Problem: Extinguishers are not inspected, serviced, or recharged when needed.
- Solution: Establish a robust inspection and maintenance regime.
- Implementation:
- Monthly visual inspections to verify accessibility, pressure gauge status, and no physical damage.
- Annual professional inspections and hydrostatic testing as required by the extinguisher type.
- Keep an inspection log with signatures, dates, and remarks.
Step 6: Documentation and compliance (Problem → Solution)
- Problem: The project lacks formal documentation to demonstrate compliance if challenged.
- Solution: Create and maintain a fire protection binder for the project.
- Implementation:
- Include hazard assessments, extinguisher maps, placement photos, inspection logs, and maintenance invoices.
- Maintain a change log to reflect any reconfigurations as the renovation progresses.
- Prepare a final report summarizing fire protection measures and compliance status for project closeout.
Step 7: Review and adapt (Problem → Solution)
- Problem: The project evolves, and the protective plan lags behind.
- Solution: Schedule periodic plan reviews at key milestones (e.g., at completion of demolition, rough-in, and finish phases).
- Implementation:
- Reassess hazards at each milestone and adjust extinguisher types, quantities, and placements as needed.
- Update site maps and training materials to reflect changes.
- Conduct a post-mortem on any near-miss or small fire event to strengthen the plan.
—
Home renovation fire safety: practical tips for homeowners
Home renovation projects, while smaller in scale, pose real fire risks. Homeowners and small contractors often underestimate the fire hazards associated with DIY electrical work, sanding, painting, and solvent storage. Here’s how to translate the professional guidance into home practice.
- Start with a household fire safety assessment: Identify rooms where dust, solvents, and electrical work will occur. Use a simple zone map to highlight high-risk areas (garage workshop, basement storage, kitchen).
- Have at least one extinguisher on each level, well-labeled and accessible. For many homes, a 2A–10B or ABC extinguisher on each floor is a practical minimum.
- Keep ignition sources contained: Use proper heaters, avoid open flames, and ensure all hot-work is performed with proper permits or under supervision.
- Safe storage of flammables: Store solvents and paints in well-ventilated, fire-resistant containers, away from heat sources and living spaces.
- Training and awareness: Even in a home setting, ensure responsible adults and contractors know how to use an extinguisher and know when to evacuate.
- Regular checks: Monthly checks for accessibility and pressure, with professional service as needed.
Home renovation fire safety is not just about compliance; it’s about protecting your family’s health and safety, preserving your investment, and avoiding the disruption of a preventable fire.
—
Common mistakes and how to avoid them
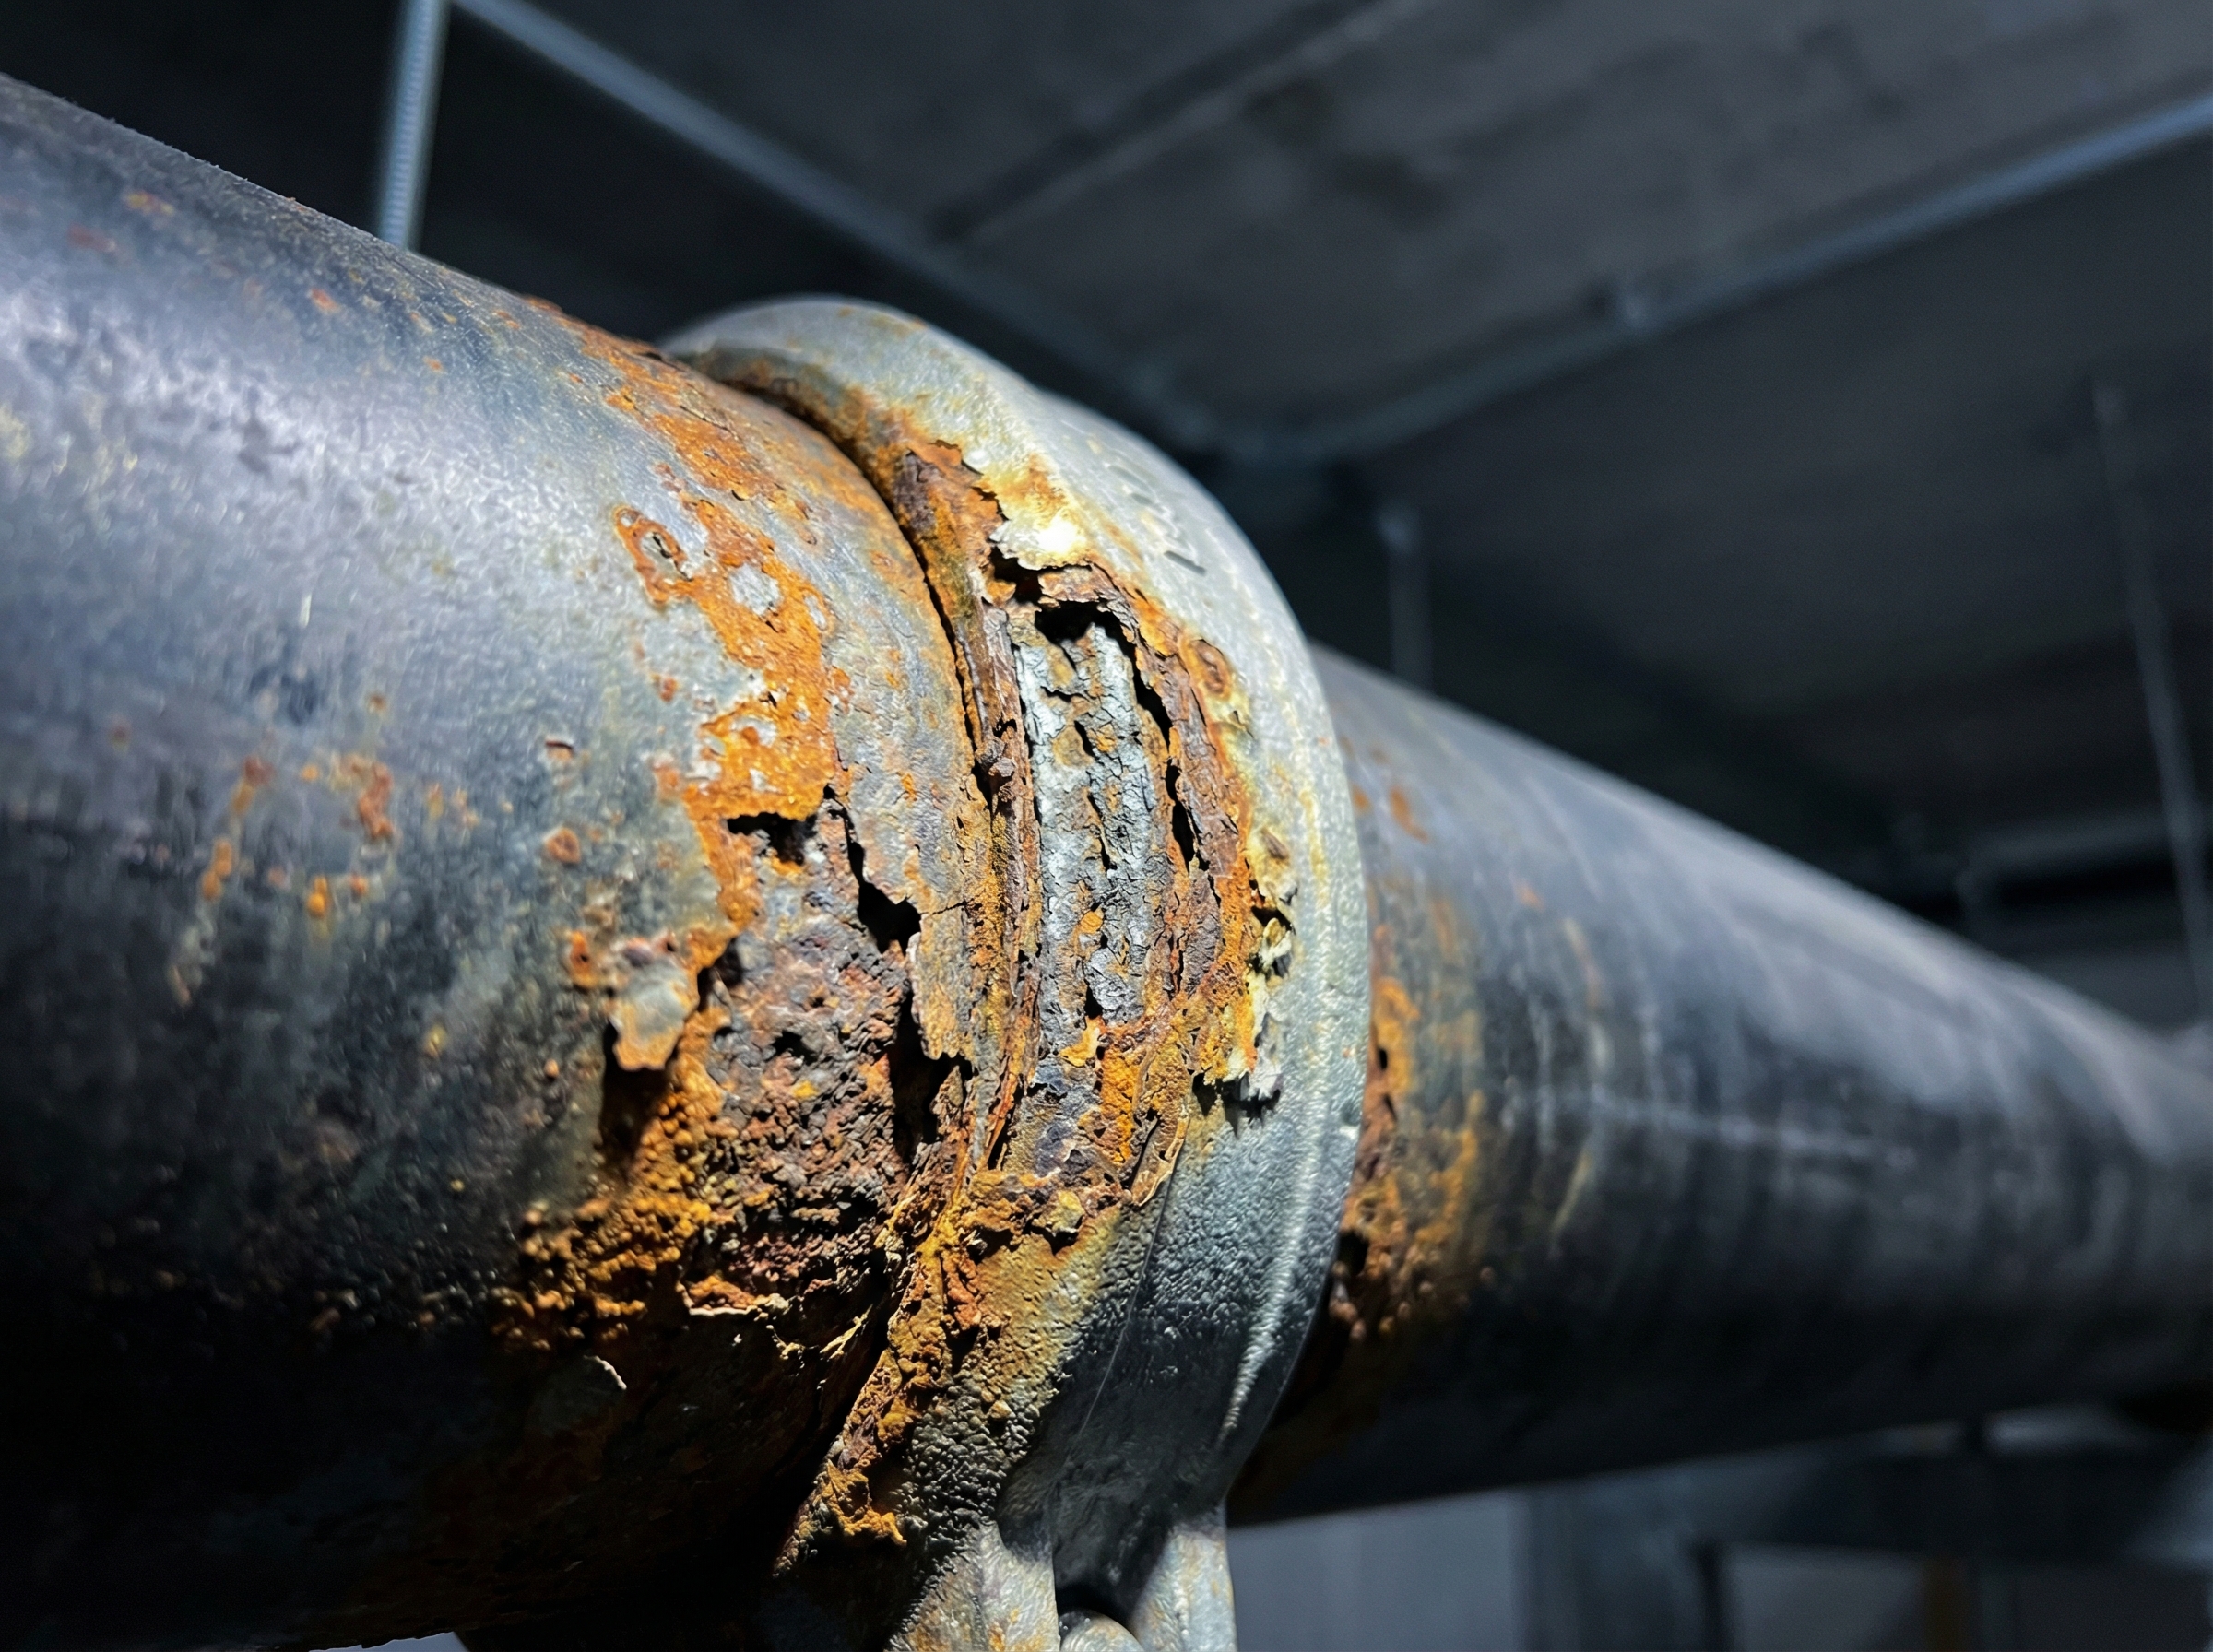
- Mistake: “We’ll rely on the building’s fire protection in place.” Reality: Renovation sites often remove, obscure, or relocate built-in protections; you cannot assume existing fire protection remains intact.
- Mistake: “One large extinguisher somewhere central is enough.” Reality: Distances matter. If the farthest point is more than the allowed travel distance for Class A hazards, you’ll need more extinguishers or higher-rated units.
- Mistake: “Extinguishers are only for emergencies.” Reality: Extinguishers support immediate action for incipient fires and can prevent escalation when used early, reducing damage and downtime.
- Mistake: “We’ll train after the project starts.” Reality: Training should be done early and reinforced regularly; a one-time training may not suffice if the workforce changes or if hazards evolve.
- Mistake: “Maintenance is someone else’s job.” Reality: The project must include a clear responsibility chain for inspection, testing, recharging, and replacement. Documentation matters.
Block quote (from a fire protection expert):
> “In renovation projects, the critical difference isn’t whether you have extinguishers; it’s whether you know where they are, how to access them quickly, and whether your team respects a living, evolving fire protection plan that grows with the project.” — Senior Fire Protection Engineer
—
The consequences of neglect: why this topic cannot wait
- Delays and project downtime: A small fire can shut down a renovation site for days or weeks, delaying occupancy and causing cascading schedule and budget impacts.
- Increased insurance risk: If a fire occurs due to non-compliance or lack of proper extinguishers, insurance claims can be disputed, and premiums may rise.
- Legal exposure: Non-compliance with OSHA and NFPA guidance can entail regulatory consequences and liability if injuries or property damage occur.
- Safety impact: The most important consequence is the risk to life and safety. Fire protection measures should, first and foremost, protect workers and occupants.
To underscore the regulatory context, see the alignment between the standards and the practical measures discussed above, including extinguisher placement, hazard analysis, and a documented fire safety program [NFPA 241-2022] and [NFPA 10], along with OSHA’s direction on extinguisher placement and ratings.
—
Quick-reference checklists to keep on track
These checklists are designed to be printed and posted on site trailers or project offices. They help ensure that essential steps are not overlooked during renovation.
Pre-Renovation Planning Checklist
- [ ] Conduct site hazard assessment and identify high-risk zones (hot work, solvent storage, electrical work areas)
- [ ] Determine extinguisher types and ratings for each zone (ABC as default; add B and C as needed)
- [ ] Create extinguisher map with locations, ratings, and mounting heights
- [ ] Establish travel-distance targets (75–100 ft) per zone
- [ ] Develop a hot-work permit process and ensure all hot work has approvals
- [ ] Assign a fire safety coordinator or point person for the project
During Renovation Checklist
- [ ] Ensure extinguishers are accessible and unobstructed in all zones
- [ ] Verify mounting heights (3.5–5 ft) and visibility of signs
- [ ] Perform monthly visual inspections and document results
- [ ] Confirm recharges or replacements after any use or maintenance
- [ ] Verify that hot-work activities have the proper extinguishers adjacent to the work zone
- [ ] Provide ongoing fire safety training for all workers
Post-Renovation/Closeout Checklist
- [ ] Collect all extinguishers for servicing or relocation as needed
- [ ] Document final inspection and sign-off for project records
- [ ] Review and update NFPA-based fire protection plan for the post-renovation occupancy
Home Renovation Fire Safety Checklist
- [ ] One extinguisher per floor, easily accessible
- [ ] Stow flammables in proper containers and away from work zones
- [ ] Ensure smoke alarms and carbon monoxide detectors remain functional
- [ ] Validate electrical work with proper lockout-tagout procedures
- [ ] Schedule a final safety walk-through with the family or occupants
—
48Fire Protection: tailored services for renovation fire safety
Near the end of a renovation, many project teams ask, “Who handles the fire protection plan and its ongoing maintenance?” 48Fire Protection stands ready to support every phase of a renovation project—from planning through closeout. Our services are designed to align with OSHA requirements, NFPA guidance, and practical field realities, ensuring you achieve compliant, efficient, and thoroughly documented fire safety.
What 48Fire Protection can provide for renovation projects:
- Site risk assessments and fire protection planning: We analyze the unique hazards of your renovation, identify high-risk zones, and propose an extinguisher mix and placement plan tailored to the site’s layout and activities.
- Extinguisher supply, installation, and commissioning: We supply ABC extinguishers and other required types, install them in the agreed locations, and verify mounting heights and accessibility.
- Hot work supervision and permitting support: Our team helps implement hot work controls and permit procedures to minimize ignition risks during welding, cutting, and brazing activities.
- Training and drill support: We offer on-site or virtual training sessions on extinguisher use, PASS technique, and the sites’ specific fire safety plan. We also support periodic drills and refreshers as the project progresses.
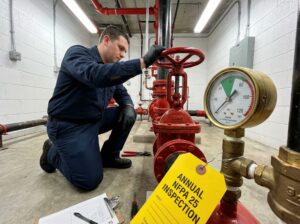
- Inspection, testing, and maintenance programs: We establish a maintenance schedule, perform or supervise annual inspections, hydrostatic tests as required, and maintain a documented log for compliance verification.
- Documentation for compliance and closeout: We compile a complete fire protection binder for the project, including hazard assessments, placement maps, inspection logs, permit records, and final closeout reports.
- Post-renovation transition support: We help transition the site from renovation back to occupancy-ready status, ensuring extinguisher densities meet ongoing building safety standards.
A robust partnership with 48Fire Protection helps ensure that your renovation remains on track, meets regulatory expectations, and keeps workers and occupants safer throughout. If you’re planning a renovation, talk to us about a site-specific fire protection plan, extinguisher strategy, and ongoing service package that matches your schedule and budget.
—
Case-in-point: a phased renovation example
Let’s consider a hypothetical but representative multi-phase renovation of a mid-sized commercial space (about 6,500 square feet) to illustrate how the concepts unfold in practice.
Phase 1: Demolition and rough-in
- Hazards: Dust and debris, sparks from cutting tools and grinding, temporary power sources, exposed wiring, flammable solvents in a finishing area.
- Extinguisher plan: Place a total of 3 extinguishers (ABC) in strategic locations along primary corridors and near the workshop space; add a heavy-duty 5B extinguishers near solvent storage. Mount heights at 4 feet above floor, with clear signage.
- Training and permits: Hot-work permit process established for any cutting or welding; employees trained on PASS technique; fire watch assigned to hot-work tasks.
- Inspection: Daily checks by site supervisor; weekly more comprehensive checks by the safety lead.
Phase 2: Rough-in (mechanical, electrical, plumbing)
- Hazards: Electrical sparking risk, solvent use in finishing areas, open flame possibilities from soldering, compressed gas storage.
- Extinguisher plan: Maintain near-tense placement to ensure 75-foot max travel distance near electrical rooms and along the mechanical corridor. Replace some units if pressure is low or if the area density has changed.
- Training: Refresher training and updated maps distributed to the crew.
- Inspection: Continue monthly inspections with documentation.
Phase 3: Finish and occupancy readiness
- Hazards: Increased finishing materials, paints, solvents; potential for housekeeping lapses.
- Extinguisher plan: Review the density and adjust; ensure extinguishers are suitable for the hazards (e.g., adding carbon dioxide where sensitive electronics will be present).
- Closeout: Document final extinguisher locations and prepare for occupancy.
This phased approach demonstrates how a well-planned extinguisher strategy scales with project complexity, ensures regulatory alignment, and minimizes disruption due to fires or near-misses.
—
Putting it all together: why this is essential for “fire safety during renovation”
Fire safety during renovation is not a one-off installation of devices; it is a living program that evolves with the project. Designing, implementing, and maintaining an extinguisher plan aligned with OSHA and NFPA expectations—while also addressing site-specific hazards—dramatically reduces the risk of fire and improves the odds of a safe, on-time project completion.
Key concept: The right extinguisher density, the right mix of extinguisher types for the hazards on site, frequent training and drills, and a rigorous inspection regime are the core components of a resilient renovation safety program.
Citations you can rely on when discussing standards and best practices:
- OSHA 1926.150: Fire protection, including extinguisher coverage and distances. [OSHA 1926.150]
- OSHA eTools: Portable Extinguishers — Placement guidance (75 ft for Class A hazard, mounting height 3.5–5 ft). [OSHA eTools]
- NFPA 241-2022: Standard for Safeguarding Construction, Alteration, and Demolition Operations. [NFPA 241-2022]
- NFPA 10: Standard for Portable Fire Extinguishers. [NFPA 10]
—
Final call to action: securing your renovation fire safety plan
If you’re planning or currently managing a renovation, the safest approach is to embed a formal extinguisher strategy into your project plan. This includes hazard assessments, extinguisher placement, maintenance schedules, workforce training, and a documented safety plan that you can reference at any time. The investment pays off in fewer delays, lower risk, and greater peace of mind for everyone involved.
One more time, the essential elements to remember:
- You need a practical extinguisher density (2A per 3,000 sq ft is a common baseline), with maximum travel distances of 75–100 ft depending on hazard class.
- Extinguishers must be accessible, visible, properly mounted, and maintained throughout the project.
- NFPA 241 guides the overarching fire protection program for construction projects; OSHA provides the enforceable requirements and expectations.
- A comprehensive plan includes training, hot work controls, housekeeping, and rigorous documentation.
If you’d like expert help aligning your renovation with these standards, 48Fire Protection offers tailored services designed for renovation projects—from site risk assessments and extinguisher planning to ongoing maintenance and closeout documentation. Our team can help you build a compliant, practical, and cost-effective fire safety program that travels with your project.