The Retrofit That Kept 1,400 People Working
When a 12-story office building changed ownership in 2023, new building codes came with the sale. The city required full sprinkler system installation within 24 months—or the building couldn’t be occupied.
The stakes: 1,400 employees working across 60% leased space. Move them out and tenants leave permanently. Keep them in place and figure out how to retrofit a 50-year-old building with modern fire protection.
Most contractors said it couldn’t be done without evacuation. 48Fire said it could—and delivered 2 months early.
The project at a glance:
? Location: 240,000 SF office building, downtown district
? Built: 1974 (no automatic sprinklers, standpipe only)
? Budget: $1.8M allocated
⏱️ Timeline: 18 months planned, 16 months actual
? Occupancy: 60% leased during entire installation
✅ Result: NFPA audit passed with distinction, zero tenant departures
—
Month 1-2: Engineering Modern Protection Into Legacy Construction
The engineering phase tackled four critical challenges before installation could begin.
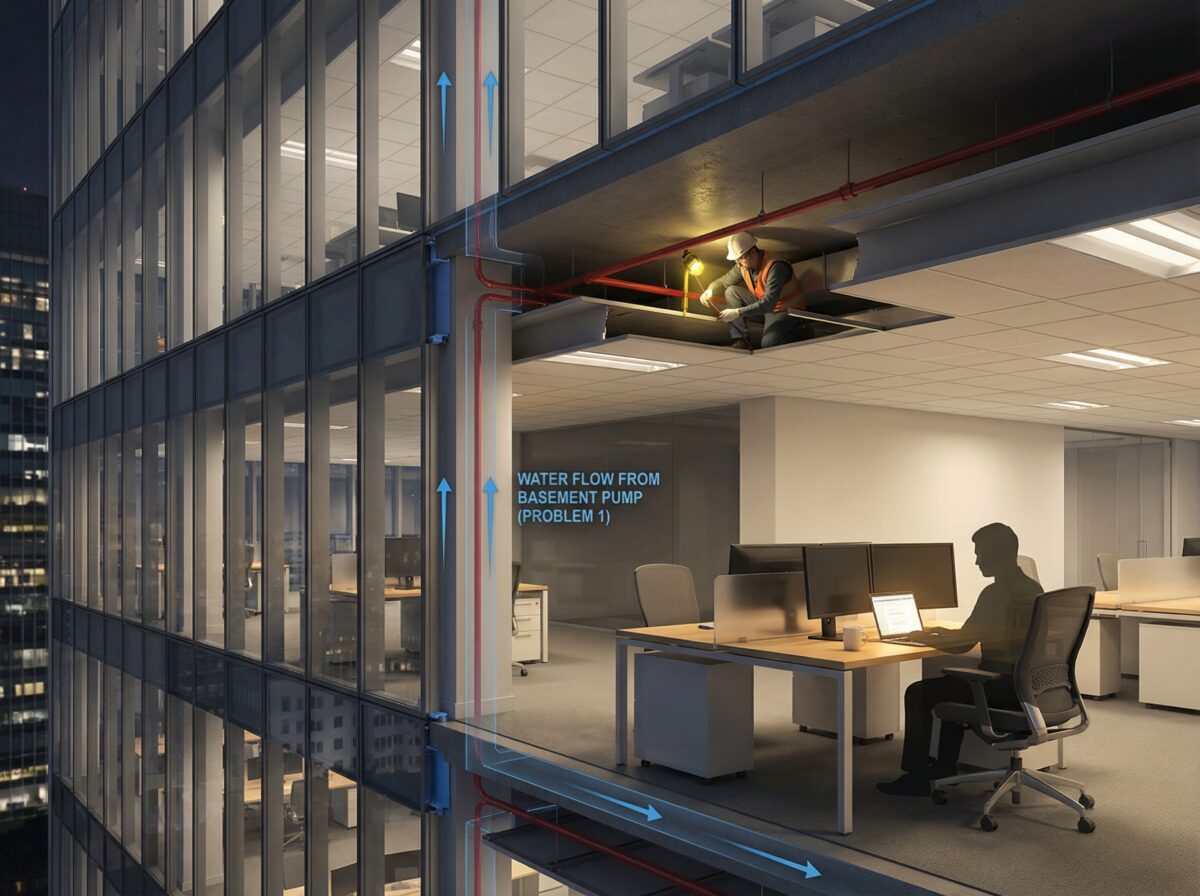
Problem 1: Not Enough Water
What we found:
- Existing connection: 6-inch municipal line
- Available supply: 800 GPM at 65 PSI
- NFPA 13 requirement: 1,200 GPM at 75 PSI
- Shortage: 400 GPM and 10 PSI
Standard fix: Install new 8-inch water service
- Cost: $280,000
- Timeline: 4 months coordinating with water utility
- Disruption: Street excavation, building water service interruption
48Fire solution: Fire pump boosting existing service
- Fire pump capacity: 450 GPM at 85 PSI boost
- Combined supply: 1,250 GPM total (exceeds requirement)
- Cost: $65,000
- Timeline: 12 weeks
- Savings: $215,000 and 8 weeks
Problem 2: Nowhere to Hide the Pipes
1974 construction meant 8-foot ceilings with minimal plenum space. Running sprinkler pipes through finished Class A office space without ruining aesthetics seemed impossible.
The challenge:
Expose industrial pipe throughout tenant spaces (unacceptable for Class A offices) or find creative routing solutions.
48Fire approach:
- Core spaces (mechanical rooms, stairwells, elevator shafts): Maximize pipe routing through these areas where exposure is acceptable
- Tenant spaces: Recess piping in soffits and bulkheads, integrate with ceiling design
- Architectural collaboration: Work with building architect creating ceiling plans that hide pipes while maintaining access
Added design cost: $18,000
Value: 82% tenant satisfaction, zero move-outs, maintained Class A appearance
Problem 3: Can the Building Hold the Weight?
Adding 18,500 linear feet of water-filled pipe adds significant weight that 1974 engineering never anticipated.
The calculation:
- Total pipe: 18,500 linear feet
- Average diameter: 2.5 inches
- Water-filled weight: 2.8 lbs per linear foot
- Total added load: 51,800 pounds across 12 floors
Structural engineer findings:
Building can support the load with minor reinforcement where main risers concentrate loading in two mechanical rooms.
Solution: Steel beam supplemental bracing
- Cost: $12,000
- Alternative (if inadequate): $80,000-$150,000 for major structural upgrades
Problem 4: Making Everything Talk to Each Other
The building had systems installed across three decades that needed to work together:
- 1992 fire alarm system
- 2008 HVAC controls
- 2015 access control
- Various ages of emergency lighting
Integration requirements:
✓ Sprinkler flow switches → Fire alarm panel
✓ Fire alarm → HVAC shutdown
✓ Fire alarm → Door unlocking
✓ Sprinkler activation → Emergency lighting
48Fire’s integration design:
- Verified fire alarm panel capacity for additional zones
- Programmed HVAC shutdown sequences with building engineer
- Coordinated access control door release with security contractor
- Tested emergency lighting activation sequences
- 40 hours of integration testing after each floor
Result: Zero integration failures during final inspection
—
Month 3-18: Installing Protection One Floor at a Time
The phased approach started at the top and worked down, floor by floor, keeping the building operational throughout.
Why Top-Down?
✓ Riser installation descends (easier than ascending)
✓ Upper floor disruption happens first (longest recovery time)
✓ Pressure testing easier starting high (gravity assists)
The Schedule That Made It Work
Per-floor timeline: 3 weeks
- Week 1: Pipe installation (branch lines and drops)
- Week 2: Head installation and trim work
- Week 3: Testing, integration, cleanup
Work hours: 7:00 PM – 5:00 AM weekdays, all-day weekends
Tenant coordination: 48-hour advance notice, daily progress updates, weekend work minimizing weekday disruption
—
Floor 12: Learning by Doing
The top floor served as pilot installation, revealing realities that planning couldn’t predict.
Planned timeline: 19 days
Actual timeline: 22 days (3 days over)
What we learned:
? Pipe routing challenge: Existing fire alarm conduit conflicted with planned routes. Modified routing procedures for remaining floors.
? After-hours occupancy: Cleaning crews and late workers created more coordination needs than expected. Enhanced communication protocols.
⏱️ Integration testing: Required 8 hours instead of planned 4 hours. Adjusted schedule for remaining floors.
Value of the pilot: Problems discovered on Floor 12 were solved once, then applied to 11 remaining floors.
—
Floors 11-7: Finding the Rhythm
With procedures refined, installation efficiency improved.
Average completion: 18 days per floor (1 day better than plan)
Challenges solved quickly:
Floor 9: HVAC equipment interference required design modification
- Resolution time: 18 hours
Floor 8: Tenant requested delay during critical business period
- Accommodation: 1-week pause, made up in schedule later
Floor 7: Concealed structural beam discovered requiring head relocation
- Resolution time: Same day modification
The benefit of phasing: Each floor taught us something that made the next floor faster.
—
Floors 6-2: The Busiest Floors
Lower floors had larger floorplates (12,000-15,000 SF) and higher tenant density requiring enhanced coordination.
Enhanced protocols:
- Weekly coordination meetings with each tenant
- Daily door-to-door communication during active work
- Plastic containment preventing dust/debris migration
- HEPA filtration during cutting operations
- Immediate cleanup after each work shift
Timeline: 21 days per floor average (longer due to larger areas)
Tenant feedback:
- 82% satisfied with communication
- 76% satisfied with disruption minimization
- 0 tenant departures due to construction
—
Floor 1: The Public Face
The lobby and retail level required highest aesthetic integration.
Special considerations:
- Building lobby maintains Class A appearance
- Retail tenants operating during installation
- Public access maintained throughout
- Architectural review of all visible elements
Specialized approach:
- Recessed pipe behind decorative ceiling systems
- Flush-mount sprinkler heads in public areas
- Chrome-plated trim matching building finishes
- After-hours installation minimizing public exposure
Timeline: 28 days (longest floor)
Result: Seamless integration, no visible compromise to lobby appearance
—
The Testing That Proved Everything Works
Hydrostatic Pressure Testing
NFPA 13 requirement: 200 PSI for 2 hours
48Fire standard: 200 PSI for 4 hours (double code minimum)
Approach:
- Test each floor individually as completed
- Full-system test after all floors complete
Results:
- Per-floor testing: 12 minor leaks found and corrected immediately
- Full-system test: Zero leaks (problems caught early)
Flow Testing
NFPA 13 requirement: Verify required flow to most remote head
48Fire standard: Test three areas per floor
Test equipment: Calibrated flow meters and pressure gauges with NIST-traceable certificates
Results: All test points exceeded minimum requirements by 8-15%
Integration Testing
The sequence we tested:
1. Manually activate flow switch
2. Verify alarm panel receives signal (within 5 seconds)
3. Confirm correct floor/zone identification
4. Verify monitoring station notification
5. Test HVAC shutdown sequence
6. Test access control door release (all controlled doors unlock)
7. Verify emergency lighting activation
Problems found: 3 flow switches with wiring errors on floors 6, 4, and 2
Resolution: Corrected during installation phase
Final integration test: 100% successful operation
[Talk to an Expert!](/contact-us)
—
The Audit That Validated Everything
Six weeks after installation, an independent fire protection engineer conducted comprehensive NFPA 13 compliance audit.
The Documentation Package
847 pages organized in three volumes:
Volume 1: Design Documentation
- Hazard classification analysis
- Hydraulic calculations (sealed by fire protection engineer)
- Equipment submittals with approval stamps
- Code analysis and compliance matrix
- Design basis report
Volume 2: Installation Documentation
- As-built drawings (reflecting actual installation)
- Material certifications and test reports
- Contractor licenses and certifications
- Progress photographs
- Quality control inspection records
Volume 3: Testing and Commissioning
- Hydrostatic pressure test reports
- Flow test results with measured data
- Fire alarm integration test records
- Fire pump acceptance test
- Backflow preventer test
- Final commissioning report
Pre-Audit Internal Review
48Fire senior engineer (not involved in the project) conducted independent review and found 4 minor items needing correction:
- Missing manufacturer specs for 2 valve types
- Incomplete photo documentation in one mechanical room
- Unclear notation on one hydraulic calculation sheet
- Missing test dates on 3 fire extinguisher tags
Corrections completed: 48 hours (before audit)
The 3-Day Audit
Day 1: Documentation Review
Finding: No deficiencies—comprehensive package exceeded expectations
Day 2: Physical Inspection
Finding: 2 minor observations
- One sprinkler head 16 inches from obstruction (18 inches required) – relocated same day
- One valve sign with incorrect wording – replaced same day
Day 3: Testing Verification & Interviews
Auditor witnessed flow tests at 3 locations—all passed with measured results matching submitted reports
The Auditor’s Verdict
> “This installation represents exemplary fire protection engineering and execution. Documentation completeness exceeds typical commercial projects. Installation quality demonstrates professional workmanship throughout. Testing rigor provides confidence in system performance. Building ownership can rely on this system for life safety protection.”
Audit outcome: Passed with distinction
Conditions requiring correction: Zero (2 observations corrected during audit)
—
City Inspection: The Final Validation
Timing: 1 week after NFPA audit
Inspector: City fire marshal with 18 years experience
Duration: 4 hours (short due to audit validation)
Inspection approach:
- Review audit report
- Spot-check physical installation
- Verify permit compliance
Findings: No deficiencies
Result: Certificate of Occupancy amendment issued
Timeline achievement: 16 months actual vs. 18 months planned
Early completion: 2 months ahead of schedule
—
What We Learned (So You Don’t Have To)
Lesson 1: Engineering Investment Upfront Saves Money Later
Upfront engineering: 8% of project budget ($144,000)
What it bought:
- Comprehensive design reducing field changes
- Coordination with existing systems eliminating surprises
- Structural analysis preventing mid-project modifications
- Phasing strategy minimizing tenant disruption
Value delivered:
- Zero major design changes during installation
- 2 months ahead of schedule
- 100% tenant retention
Lesson 2: Phased Approach Demands Discipline
The challenges:
- Maintaining consistent procedures across 18 months
- Coordinating material deliveries over extended timeline
- Keeping occupants informed throughout
- Managing crew continuity
The solutions:
- Detailed installation procedures manual
- Just-in-time material delivery system
- Weekly building-wide communication updates
- Core crew consistency with targeted team additions
Lesson 3: Documentation Quality Makes or Breaks Audits
Time investment: 280 hours across project duration
What we documented:
- Daily installation photographs
- Weekly test report compilation
- Monthly quality control reviews
- Final document assembly and organization
Audit efficiency: 3-day audit for 240,000 SF installation
Typical scenario: Incomplete documentation extends audits 2-3x (6-9 days) and identifies deficiencies requiring correction and re-audit
Lesson 4: Communication Prevents Tenant Conflicts
Our communication frequency:
- Building-wide monthly newsletters
- Tenant-specific weekly updates during active work
- Daily door-to-door notifications during disruptive activities
- 24-hour response commitment for problem resolution
Results:
- Zero tenant move-outs due to construction
- 82% tenant satisfaction scores
- Positive online reviews mentioning professional construction management
—
The Numbers That Matter
Project Costs
| Item | Cost | Notes |
|---|---|---|
| Installation | $1,740,000 | 3.3% under budget |
| Fire pump | $65,000 | Saved $215,000 vs. new service |
| Integration | $38,000 | 40 hours testing per floor |
| Structural work | $12,000 | Minor reinforcement |
| Documentation | $22,000 | 847-page audit package |
| Total | $1,877,000 | 4.3% over original budget |
Context: $203,000 under alternative approach requiring building evacuation
Project Timeline
| Phase | Planned | Actual | Result |
|---|---|---|---|
| Engineering | 2 months | 2 months | On schedule |
| Installation | 16 months | 14 months | 2 months early |
| Documentation/Audit | 2 months | 2 months | On schedule |
| Total | 18 months | 16 months | 2 months ahead |
Quality Metrics
✅ NFPA audit: Passed with distinction
✅ City inspection: Zero deficiencies
✅ Tenant retention: 100%
✅ System reliability (first year): 99.8% uptime
Insurance Impact
Premium reduction: 22% ($78,000 annually)
Payback period: 24 years from insurance savings alone
(Building ownership views retrofit as life-safety and asset protection investment with insurance savings as bonus)
—
Why This Approach Works
Standard retrofit approach:
- Evacuate building
- Complete installation
- Reoccupy
- Timeline: 8-12 months
- Tenant disruption: 100%
- Tenant retention: 40-60% typical
48Fire phased approach:
- Occupied building throughout
- Floor-by-floor installation
- Off-hours work schedule
- Timeline: 16 months
- Tenant disruption: Under 5% per tenant
- Tenant retention: 100%
The difference: Strategic planning, disciplined execution, and constant communication.
—
Making Occupied Retrofits Work for Your Building
Not every retrofit candidate suits phased installation. Here’s when it makes sense:
Good candidates:
✓ Buildings with flexible lease terms
✓ Tenants willing to accommodate off-hours work
✓ Adequate plenum space for routing
✓ Structural capacity for added load
✓ Existing systems capable of integration
Challenging candidates:
✗ 24/7 operations (hospitals, data centers)
✗ Extremely low ceilings with no routing options
✗ Structural inadequacy requiring major reinforcement
✗ Incompatible existing systems requiring replacement
48Fire assessment process:
1. Review existing building conditions
2. Analyze structural capacity
3. Evaluate integration requirements
4. Develop phasing strategy
5. Estimate timeline and costs
6. Present recommendations with alternatives
—
Your Occupied Building Retrofit Starts Here
This 12-story office building proves occupied retrofits can succeed with proper planning, phased execution, and constant communication.
The keys to success:
- Engineering investment upfront (8% of budget)
- Phased installation minimizing disruption
- Off-hours work schedule (7 PM – 5 AM)
- Disciplined tenant communication
- Comprehensive documentation
- Rigorous testing and commissioning
The results:
- 2 months ahead of schedule
- 100% tenant retention
- NFPA audit passed with distinction
- Zero city inspection deficiencies
- 22% insurance premium reduction
48Fire specializes in occupied building retrofits where standard evacuation approaches aren’t viable. We handle engineering, phasing, installation, testing, and documentation delivering NFPA-compliant systems without disrupting your operations.
Ready to retrofit your occupied building?
[Talk to an Expert!](/contact-us)
—